Canalblog
Suivre ce blog Administration + Créer mon blog
Publicité
Parole de pâte
22 août 2009

Kaleidoscope cane with a base of four facets

The kaleidoscope is a XIX century invention (look at the WIKI page about it) which consists in multiplying an image by a number of facets in mirrors. This device was most known by its playing side and by its beauty. Adapting it to the polymer clay means to multiply a cane by cutting it into pieces and join them into mirrors, playing with the optical effect obtained by the multiplication of the pattern into a unique cane. Polymer clay artists make wonders with this basic idea, wonderful patterns each with its unique style. I love this idea and I try a pattern with a base of four, as you can see here an execution in a ring.

1130 bg

I start easily with a base of four, but I choose to use a cane quite "hallucinogenic" with some skinner blends in order to stress the optical effect: this idea came from the flower cane of the previous article. I used some fimo clay, a pasta machine, some blades and a ruler. The blends are made at setting nr. 1 and the coating of fimo gold at nr. 6.

Picture 1: the first blend is in the blue tones, I used 1/3 white (nr. 52) + 1/3 pastel blue (the new nr. 305) + 1/3 mint blue (nr. 49).

BJR 1   

Picture 2: the second skinner blend is made at several times, from rose to yellow creating an orange tone (rose 22 + yellow 16), then some yellow to white for the end. Each blend is stretched to make an accordion, which is sensible on the blue side.

BJR 2

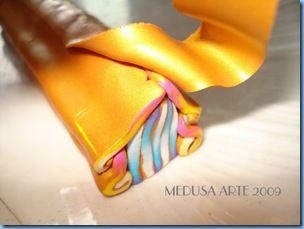
Picture 3: the skinner blends are wrapped in fimo gold.

BJR 3

Picture 4. the blended canes are stretched and extended taking care to keep the blue on one side and the wthite in the other in a flat shape.

BJR 4

picture 5: this long cane is passed at setting nr. 1 on the pasta machine and comes out as a ribbon. I cut each ribbon in the same length and in 6 equal parts (so I get 12 pieces with the two colours).

BJR 5

Picture 6: 5 of the 6 parts are needed to make the centre of the pattern, pressed together top-to-tail, the last pieces are used later.

BJR 6

Picture 7: the blue center of the pattern is delicately shaped with a point on the higher side and kept flat at the base.

BJR 7

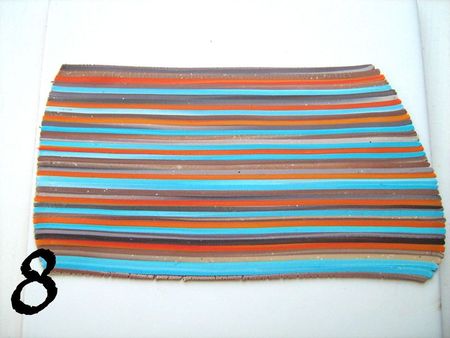
picture 8: the pieces of rose/yellow ribbon are shaped with a beginning of spiral pattern on one side, as an inverted question mark. As for the top two, I added a very thin log of gold fimo in order to give some thickness, as I found the shape too flat, but this is not compulsory. Here I use 4 of the 6 slices of the yellow ribbon, leaving two more for later.
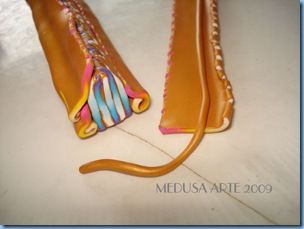
BJR 8
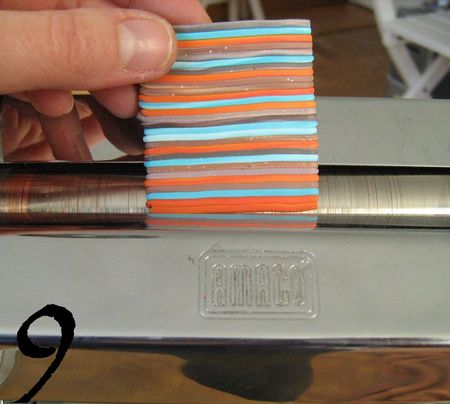
Picture 9: some like a striped face surrounded by ringlets, the pattern is done.

BJR 9

Picture 10: a layer of golden fimo very thin hides the  irregularities on the top, as fpr the bottom.

BJR 10

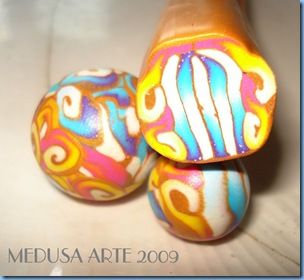
picture 11: the cane for the base pattern is ready, I use the left-over clay to make some try-beads.

BJR 11

picture 12: the cane is cut intoo 4 equal parts, after having shaped a point on the side which will form the center of the kaleidoscope.

BJR 12

picture 13: the two sclices of the yellow-rose ribbon and the leftover from the blue one will form the spiral pattern.

BJR 13

picture 14: this cane will be stretched and extended in a triangle to fit the empty spaces, so you need to have the same length as for the base cane and cut it into four as that one. The leftovers from this cane will suit to make some trials.

BJR 14
Picture 15: here are the results befors working out the whole cane.

BJR 15

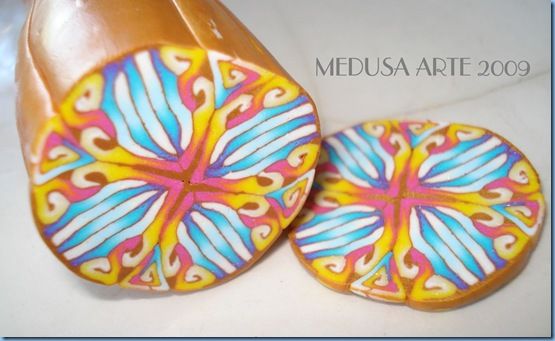
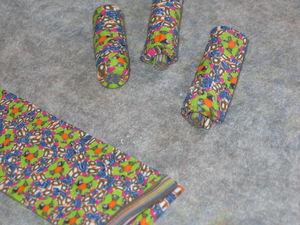
Picture 16: the kaleidoscope cane with a base of four done, pressed and cut gives as a result a repetitive pattern.

BJR 16

We could continue to cut the cane and assemble it again, as in a real kaleidoscope we add mirror facets. Maybe for another stage, as this was my very first one and I need it to make at least a hundred beads. I'm curious though of the results I could have obtained by cutting it into six... still a story of thickness of stripes! I hope you enjoyed this and it could give you inspiration for many creations, see you soon!

MEDUSA

This tutorial with images is an intellectual property of its author.
Please, respect his/her work and do not copy / reproduce / translate it without his/her authorization.

Translated by Maria: chiocciolazzurra@yahoo.it

en français ici

Publicité
Publicité
13 juillet 2009

A tutorial for ball beads

grisnleu

1 and 2 - you make a small amount of pieces of clay in the contrasting colours you prefere, and assemble them in a log:

un

deux

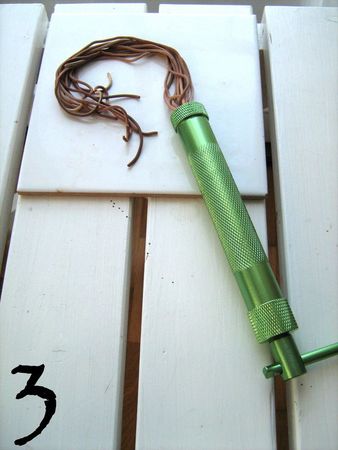
3 - pass this log through a clay gun with the spaghetti cap in order to make plenty of thin strings:

trois

4 -  make the same with the other colours you chose:

quatre

5 - line up the strings on a sheet of clay very thin, and trim the edges:

ciqn

6 - pass a roller on this sheet in order to flatten the clay:

six

7 and 8 -pass this sheet at the pasta machine through the thinnest setting

in order to maintain very thin lines:

sept

huit

9 and 10 - ou can also pass the sheet in the horizontal way to obtain larger lines:

neuf

dix

11 - cut a stripe as large as the ball

pay ATTENTION to the direction of the lines during the cut: the stripe you cut must be perpendicular to the lines

onze

12 - put the cut stripe around the ball and link the edges neatly:

douze

13 and 14 -kindly stretch the clay in order to close the bead on every side

treize

quatorze

15 - roll the beads in your hands and smooth it perfectly : you're done!!

quinze

There are other ways far more quick to realise a sheet of striped clay without a clay gun, but I do not have the links, and beside that I love the clay gun effect
----------------------------------   

Vero from Mona Mokume propose another method here to realise balls of clay, maybe a little easier...

Have fun!!

gris bleu

---------------------------------------

to make your job easier you can use this trick from domillepate

you can try with other patterns, with any kind of sheet, and this is convenient to use the remains of canes and to match our beads

véro method :

ballon

ballonun

ballondeux

ballontrois

merci à maria pour la traduction de cette leçon en images à la demande

de nos lectrices non francophones

pour la version en français c'est ici

13 juillet 2009

A Flower cane in a blue white and green blend

I wanted to make a green flower, but as green is not my favourite colour, I've made this skinner blend with some blue clay (nr. 49) and some green (cernit nr. 215). In order to lighten it up, I interpose between the two colours some white, made with half white 0 and half fluo. As fimo and cernit do not have the same thickness/consistency, I cut the geren cernit with some white fimo very soft, until the two clays have the same thickness. I've used a pasta machine for these blends, a ruler to cut the canes, some coloured clays and some translucent clay.

Picture 1: first, I make a blend with blue and white, then a grren and white blend with the pasta machine setting nr. 1, and then I put the two blends together. As for the amunt of clay I use: for every blend I use around 1/3 of a 56gr block, adapted to the dimensions of the pasta machine. The "trio" blend (1/3 green+1/3 white+1/3 blue) I obtain has then been rolled through the pasta machine in order to obtain the accordion shape.

bleuvert 1

Picture 2: some gold clay has been rolled through the pasta machine at setting nr. 6, and wrapped around the block obtained from the blend.

bleuvert 2 

Picture 3: the cane obtained is stretched on the length side and made as thin as possible, paying attention to keep the colours well distinguished through the band, the green on one side and the blue on the other, with the white always in the center. Then, the cane is passed through the pasta machine on the larger setting to obtain a long ribbon.

bleuvert 3

Picture 4: the long ribbon is measured and then cut into several equal small ribbons (you cut the ribbon according to the length you have obtained). I obtained 11 small regular ribbons and I put them together top-to-tail, reversing the colour each time.

bleuvert 4

Picture 5: the top side is tightened with a slight pressure in order to shape the point of a petal.

bleuvert 5

Picture 6: I put a string of golden fimo to fill the gap and I wrap the cane with a sheet of the same colour rolled at nr. 6 setting of the pasta machine

bleuvert 6

Picture 7: the base will remain slightly flat but will be filled up with some gold clay rolled at nr. 6 setting of the pasta machine

bleuvert 7

Picture 8: the petal cane which results is light at the center and golden around. I make an attempt with the leftovers of the cane in order to the the harmony of the colours.

bleuvert 8

Picture 9: In order to prepare the heart of the flower, I choose some colours which are opposed to the petals: a fire blend made with these fimo colours: 26 red+42 yellow+16 yellow+white 0 (the proportions are irregular, as I wanted to obtain a quite light cane, using less red then the other colours). As I want to keep a large part of the cane to make some assorted beads, I build up a cane far more large then what the heart takes.

bleuvert 9

Picture 10 : The coloured accordion.

bleuvert 10

Picture 11: the accordion covered by a golden sheet made at the pasta machine setting nr. 6

bleuvert 11

Picture 12: the result from picture 11 is rolled with the pasta machine at the larger setting, in an opposite direction to that of the green-blue ribbon, which was rolled in the length to obtain a long ribbon. The red-fire cane is rolled on its entire width passing through the pasta machine breadth to obtain a large shaded ribbon. This big sheet is cut into 3 identical sheets rolled together.

bleuvert 12

Picture 13: the green-blue cane is stretched on a multiple of 6 and then cut. a piece of the red-fire cane is stretched corresponding to the flower cane length.

bleuvert 13

Picture 14: the assembling of the flower cane with the points outside.

bleuvert 14

Picture 15: finishing with some translucent clay. You can use a solid colour if you prefere.

bleuvert 15
Picture 16: The cane completed and cut.

bleuvert 16

Have a nice clay!!
Medusa

merci à maria pour la traduction de cette
leçon en images à la demande de nos lectrices non francophones pour la version en français c'est ici

27 avril 2009

Tartan Cane

36452203
36452217

Tartan Cane step 1:

Take some violet and some black clay an pass it through the maximum size of your pasta machine. Start to alternate layers of each colour whil beveling the edges with a cutter as long as you add layers Put the log on one side and cut in order to obtain a square log and reduce it. Cut this log in two and lay them in a diagonal with two other logs, one violet and one black, in order to form a bigger square log. Then make two cuts as in the picture, one horizontal the other vertical. Fill these cuts with thin layers of rose clay.

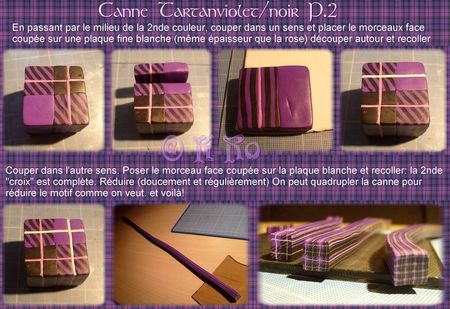
Tartan Cane step 2:

passing through the second square with one colour, make anoter cut and fill this cut with a thin layer of white colour (the same thickness of the rose above). Make a cut on the other side and do the same with some white clay: the second cross is completed as in the picture. Start to reduce this cane softly and regularly. You can multiply this cane as you desire by stacking the original cane to make a tartan design as in the picture. Voilà!!

by:
K Ro


Translated by Maria: chiocciolazzurra@yahoo.it 
This tutorial with images is an intellectual property of its author.

Please, respect his/her work and do not copy / reproduce / translate it without his/her authorization.


8 décembre 2008

Tutorial Matisse cane

en français ici

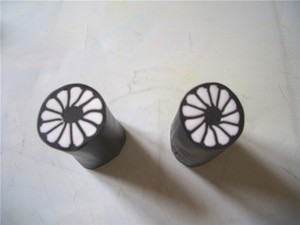
there was a challenge in our polymer clay group about the theme "Matisse and the polymer clay artists". I chose one painting from this artist which was good to reproduce in a cane. These are the steps to make it.

and this is the model:

fd_030105_matisse2

CIMG5199

    1 ) make 12 white logs          

CIMG5200

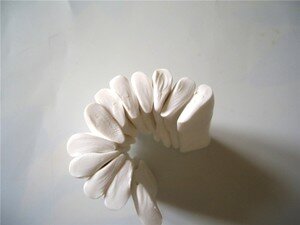
       2) give them the shape of petals

CIMG5202

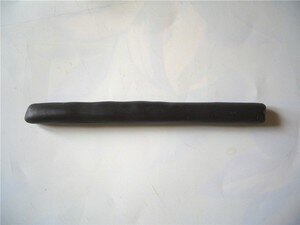
3) make a black log to form the center of the flower   

CIMG5212

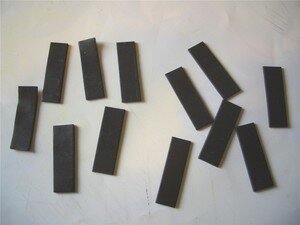
       4) and 12 little black strips

     CIMG5213      

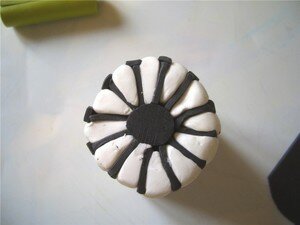
   5) arrange the petals around the center, by putting the black strips between them      

CIMG5214

                  6) cut 12 little black sticks

CIMG5215

    7) arrange them to fill the gaps between the petals            

CIMG5216

     8) wrap the big log with a black sheet of clay

CIMG5217

        9) reduce the cane and cut it in two   

CIMG5210

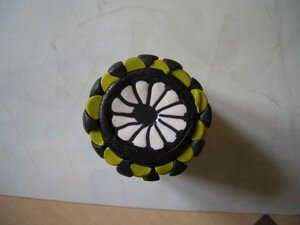
    10 ) prepare 6 green logs

CIMG5211

      11) cut them in two         

CIMG5219

           12) arrange them around the flower cane

CIMG5221

    13) insert some black triangles between each green log 

CIMG5218

14) wrap this big log with a black sheet of clay

CIMG5233

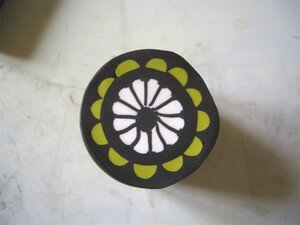
15) and this is the first flower

CIMG5225

16) you make the same with some blue clay and the other log

CIMG5222

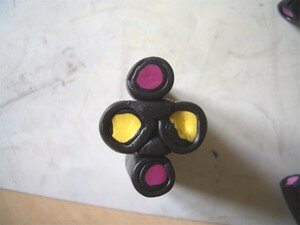
18) prepare a yellow log, a fuchsia one and a light pink one with a strip of black clay around       

CIMG5223

                19)  reduce these logs and cut them into two (into 4 the light pink one)   

CIMG5228

                  20) place the two yellow logs one next to the other and fill the gaps with black triangles

CIMG5229

                 21) place the fuchsia logs.....    

CIMG5231

                  22)....and the light pink ones as in the picture and fill all the gaps with triangles and strips of black clay

 CIMG5232   

23 ) this is the result

CIMG5235

                 24) reduce the canes (the yellow and rose one must be in a square shape)                  

CIMG5238

  25) and place them as in the picture

CIMG5239

26 ) wrap this big log with a black sheet of clay

CIMG5241

and this is it!

fd_030105_matisse2

FLOFIMO


Translated by Maria: chiocciolazzurra@yahoo.it


This tutorial with images is an intellectual property of its author.

Please, respect his/her work and do not copy / reproduce / translate it without his/her authorization.


Publicité
Publicité
19 novembre 2008

A technique to make multicoloured tube beads

I love so much those african beads, and so I've managed to make the same with Fimo clay! There are several techniques, and this is mine!

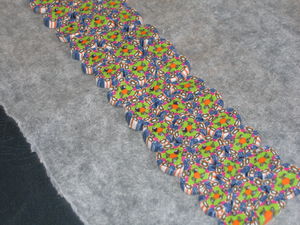
1/ first, you make a coloured cane (preferably a millefiori one), you cut it into slices and you prepare a sheet by putting the slices one beside the other.

IMG_2860

2/ put your plate between two sheets of greased paper (to avoid it sticks to the working place) and flatten it in order to blend the slices together.

IMG_2861

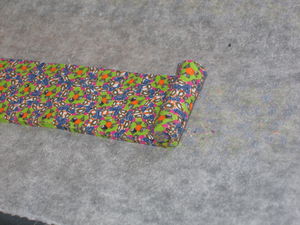
3/ when you have flattened the plate, cut the edges and with the scrap you prepare a little log which will be the center of the beads. Put this log on the plate and roll  to put around it the coloured sheet. Then cut and adjust the bead.

IMG_2864

IMG_2867

IMG_2869

4/ bake the beads as usual. Personally, I make the holes after baking.

Have a nice time!!

Vivi (fimo de Vivi)

IMG_2920

Translated by Maria: chiocciolazzurra@yahoo.it

This tutorial with images is an intellectual property of its author.
Please, respect his/her work and do not copy / reproduce / translate it without his/her authorization.

1 octobre 2008

again... but we never get enough!

Tutorial flower cane by  Sabine

en français ici

tutosabun

1 - Make a skinner blend with three assorted colours (at least half a pack of each), then pass it in the pasta machine at the thinnest grade (#1)(from the clearer to the darkest side, in order to avoid bad smears); 2 - fold this sheet as in photo nr. 3; 3 - make a thin sheet with black clay and wrap it around the log, then cut it into 4 equal parts

tutosabdeux

4 - take two pieces and round them from one side (ph. 6); 5 - with a cylinder-shaped object (as a pen) press within the darker sides in order to put a pistil between them (ph. 7); 6 - to make the pistil make a little red log with a thin black sheet around, and again a red one; 7 - Under the pistil, put a thin sheet of red clay covering less then half log and a serpentine of the same colour as in photo n. 10; 8 - take the two remaining blocks and stretch them, pinch the two sides and put them around the heart of the flower as in ph. 11 and 12; 9 - reduce this log in a long one of 16 cm. and cut it into eight pieces of 2 cm (ph. 13-14); 10 - the petals are thus ready by pinching each of the 8 pieces on their sides (ph. 15). start to assemble them together leaving a hole at the center (ph. 16), adjusting their thickness in order to have a proper measure to form the heart later. As a variation, you can make a flower with six petals.

tutosabtrois

11 - let's make the heart of the flower. to do this, make a little log of black clay (quite thick) and wrap it on half side  with a thin sheet of red (ph. 17). Reduce it in order to obtain a 20 cm. long log for a 5 mm. diameter. 12 - pinch the red side of this long long as in photo 18, then cut it into 10 pieces and put them close one to the other on the larger side to form a round log(ph. 19). 13 - wrap this log with a sheet of red clay (ph. 20).  14 - reduce this log to the proper size and put it at the center of the flower (ph. 21). 14 - place between the petals some translucent clay to fill the spaces, reduce the cane  and the game is done!

Translated by Maria: chiocciolazzurra@yahoo.it

This tutorial with images is an intellectual property of its author.
Please, respect his/her work and do not copy / reproduce / translate it without his/her authorization.

8 septembre 2008

The magic of hidden-magic

1 - choose some appropriate colours which can give an harmoniuos effect, better than to use monochrome shades. here I chose three colours, I think it has a cool effect, better than with two.

hmun

2 - prepare different skinner blends, always with one colour and the white.  3 - after quite a lot of passages in the pasta machine, you get three skinner blends which are more or less conspicuous.

hmdeux

4 - when the blends are ready, you can roll each one of them in order to get three logs;

hmtrois

5 - wrap each log with a sheet of black clay (2/3 of the block of remaining black clay, at 6/7 of the pasta machine). at this stage, it isn't a work of very fine and precise craft, as for the following stages...
6 - reduce the logs until you have three long logs with a diameter of 1-1,5 cm. cut these logs into 5/6 cm. lumps

hmquatre

7- stack the lumps in a random way as of the colours: your goal here is to form a square cane with them. mine here was quite as long as a flexible blade, after a slight reduction. 8 - you take this square cane, you put one of the angles on your work surface and you just press it, stretching at the same time the sides a little in order to obtain a regular nice shape.

hmcinq

9- you pass this thick sheet in the pasta machine in the largest setting in order to get a homogeneous sheet;
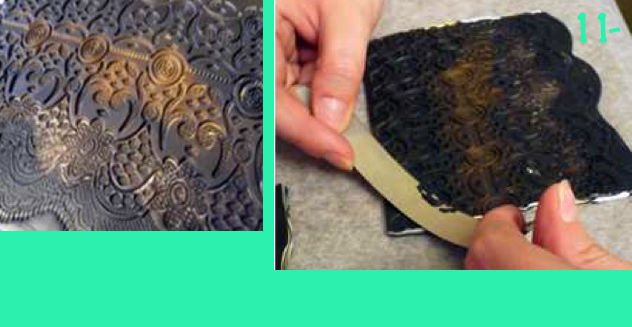
10- you apply on the sheet the texture you prefere, taking care of  pressing it hard with a brayer; in order to well embed the texture in the clay, you can put it directly on the table, and you apply the sheet of clay upon it, passing the brayer directly onto the clay: like this the texture is well imprinted on the clay, the pattern comes out and you can start with the surface cutting. 

hmsix

11- you cut the surface little by little, by keeping the blade always a little bent; as long as you retire it from the clay, remove it from the surface; make sure to cut only the raised patterns, little by little you will discover the colours below and you can play with it as you desire....

hmsept

pdf version by clicking on the image

afia

Realised by  missbeb

Translated by Maria: chiocciolazzurra@yahoo.it

This tutorial with images is an intellectual property of its author.
Please, respect his/her work and do not copy / reproduce / translate it without his/her authorization.

autre version ici

en français ici

28 juillet 2008

Chinese beads, yin et yang

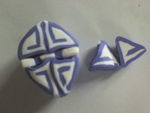
Photos_06_01_08_954Photos_06_01_08_945Photos_06_01_08_948

To make Chinese beads you need:

a Chinese pattern

2 Fimo colours in contrast

The pattern with quarters of circle will be realised in a cane, then reduced and cut in 4 triangle logs, which will surround the horizontal line in the middle.

Photos_06_01_08_949Photos_06_01_08_950Photos_06_01_08_952

First, make a little white log and model it in a triangle shape; insert it between the two vertical sides, blue on the left and white on the right; then put down the white in the right and add a small piece of blue in order to close the quarter of circle. Cut the excess of clay.

Photos_06_01_08_963

After a while in the fridge, reduce the quarter of circle cane in a triangle (it will be again made round when reduced in a next stage), cut it in 4 equal parts and put them around a striped slice prepared before which makes the centre of the pattern. Now keep on reducing the cane.

Photos_06_01_08_956Photos_06_01_08_957Photos_06_01_08_958

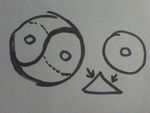
As for the Yin and Yang cane, you need to break down the pattern into two circles with a contrasting core and then add the two triangle logs of the same main colour to complete the pattern. The amounts of the two colours must be the same.

Model the central log in one colour and then put around it a thick slice of the second colour. Model a triangle which will marry the log of the other colour. 

Photos_06_01_08_959Photos_06_01_08_961Photos_06_01_08_962

Proceed the same way with the other two contrasting colours. Put the cane in the fridge and then reduce it in a round shape.

Colette : http://mespetitesfimos.canalblog.com

IMGP0593_edited

Translated by Maria: chiocciolazzurra@yahoo.it

This tutorial with images is an intellectual property of its author.
Please, respect his/her work and do not copy / reproduce / translate it without his/her authorization.

en français ici

30 juin 2008

Some geometry...

The geometric cane according to  Mathilde COLAS

en français ici

mathun2

1. Make two skinner blend c1 and c2 with two different contrasting colours: the amounts of clay will be around a half Fimo block for each colour, and the clay should be of the same consistency (either soft or classic). 2. Cut two 2 cm. stripes, one  in c1 and one in c2: superpose them on each other, taking care of  reversing the clearer sides. 3. Cut the edges in diagonal.

mathdeux

4. Roll c1 and c2 to make a spiral (or jellyroll) cane. Roll the spiral cane until it is 1 cm diameter and cut the edges with a clear cut. 5. Take again the first skinner blend and cut a 3 cm stripe. Pass it in the pasta machine from the larger to the thinnest size possible (just before it start to stick).

mathtrois

6. Take this large stripe and bend it in an accordion way, in order to have a log of clay in a blend. 7-8. Take some black fimo clay and pass it in a thin grade of the pasta machine (here the n. 6): you will have a thin sheet of black which you will wrap around the blend log. 9. Start to progressively reduce the cane breadthways in order to have the blend in the longitudinal way: this until you have 1 cm width. You cut the edges for each new stage.

mathquatre

10- After this, pass this blend cane through the pasta machine in a larger setting (here n.1) in order to have a stripe which can be cut into 5 or 7 pieces (an odd number). Arrange these pieces alternate one above the other. 11. ...just to obtain this... Take again this cane and model it in a triangle

mathcinq

12. Repeat the same operation with the c2 cane from step 5 to 9, but cut the pieces into an even number (at least 8). 13-14. Take all the pieces and arrange them around a slice of spiral cane on both sides: you must have cut the cane the same length as the pieces. The clearer edges are going on the  same side. 15. Then you model the cane in a triangle.

mathsix1

16. Reduce and adjust the two triangle canes c1 and c2 in order to have the same size. 17. Take the end of the skinner blend c2 or another colour c3, roll it as a bullseye cane with the clearer clay inside and then cut it in 4 equal parts. 18. Put these parts around the rest of the spiral cane, with the clearer clay outside. 19. Reduce this new square cane to have four sides of the same length of the base of the two triangle cane.

mathsept

20. Arrange on each side of the square the triangle canes c1 and c2. Your final cane is at the end. Now you can continue to work on it to make it more complex if you like.

mathhuit

Again, reduce the cane, cut in in 4 pieces which you are going to arrange as you like the best, either on a symetric joint, or on a symetric opposite way.

To discover her work you can go here

Many thanks also to Monique for her pictures and to Marie-Ange for the text.

Translated by Maria: chiocciolazzurra@yahoo.it
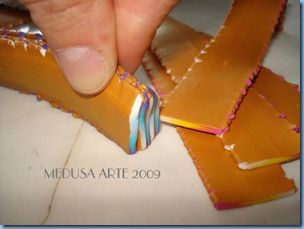
This tutorial with images is an intellectual property of its author.
Please, respect his/her work and do not copy / reproduce / translate it without his/her authorization.
Publicité
Publicité
<< < 1 2 3 4 > >>
Publicité
Newsletter
Visiteurs
Depuis la création 8 904 082
Publicité