

Tutorial: Fimo hollow beads
Tutorial: Fimo hollow beads
par Florence
The trick which allowed me to realise this creation, was learnt during Chritine Dumont atelier, an artist I admire so much.
this is the tutorial:
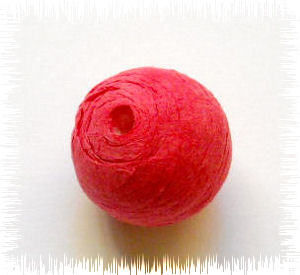
Take the polymer clay in whichever color and brand you prefer, and a paper ball (in French: cotillon, the one you throw with joy on the head of your friends during parties)
You cut a square of clay (passed at the largest set on the pasta machine). The square must be large enough to cover the paper ball. Refold the corners on the ball and cut the exceeding clay with a cutter. Then, mend the edges (with the fingers or a small roller) in order to cancel the connections traces.
this will result in a bead well rounded and smooth. You will put it in the oven and bake it, following the precise instructions of the chosen brand.
After that, put an end piece cylinder-shaped on your electric drill and pierce four big holes on the four poles of the ball. Make sure your end piece is well at a right angle on the bead and that you keep it steady during the making (this will avoid to see UFO flying during the process).
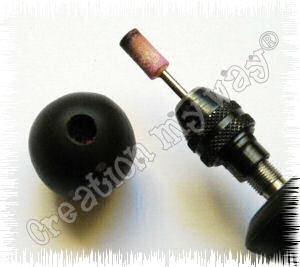
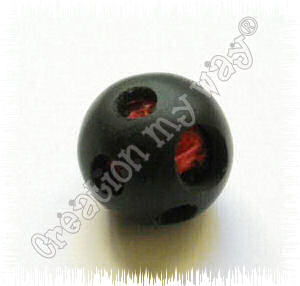
When you will have made four big holes on the bead, you take a finer end piece cylinder-shaped ancd you make some other smaller holes. But not too much, in order not to make the bead too fragile. (I know, it is not easy to slow down at this stage, but you will make it!). After that, you plunge your bead in the cold water and you let it simmer for about half an hour.
Using a crochet rod, similar to the one used for crustaceans, remove very carefully, little piece by little piece, the scraps of the cotillon.

Une fois cette opération faite, changez votre embout de perceuse pour des forets de tailles différentes et lâchez-vous. Faite tous les trous que vous voulez pour que votre perle soit harmonieuse sans trop les rapprocher pour que la perle reste solide.
This operation done, you can change the end piece on your electric drill using the sizes you prefer and you start amusing yourself. You can do all the holes you like to, trying to harmonize your bead and not to have holes too close one to another, otherwise your bead will be too fragile.
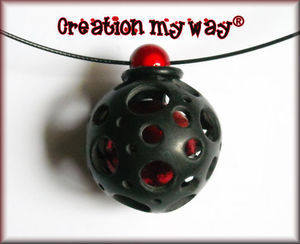
And this is it!!!

Isn't it simple? This was also created by a designer I didn't know, and that I've just discovered:
Einat
-----------------------------------------------------------------------------------
The story goes on...
When two polymer friends take up a challenge, is is possible to resist?
Genviève, alias Jancydol, seeing my bead, challenged me to create a bead within the bead. And thanks to a little trick from another friend, Marie-Christine, alias MCBE Créations, I could rise to this irresistible challenge! LOL
My trick consists in using some toilet paper or kitchen roll to make a bead. If you want to use it to lighten a polymer bead (not with holes), you can add some white glue mixed to water to the paper, and let it dry before you recover it.
If, like Florence, you want to take away the paper when the bead is baked, you do not have to mix glue or use a cotillon bead instead. After thinking about this trick, Florence and I had the same idea: to make a bead in a cage.
This is my way:
You will need:
-a bead or a ball (better if it is not pierced) around 1,5 cm or more little.
- 2 to 3 polymer clay bars (here Fimo), in colors which match the bead
- a clay gun (it will make the processus more rapid) with a rectangle end piece
- 3 to 4 sheets of toilet paper
- a little bowl of water
Tear the toilet paper in strips (1 cm large)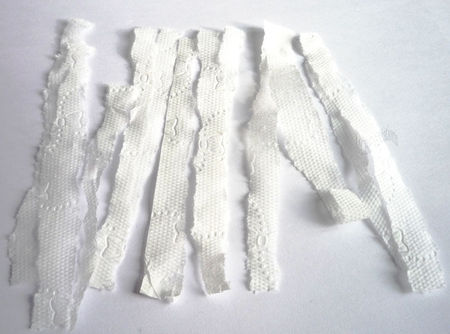
Start to enwrap the bead with the paper, moistening it with a finger (but not soaking the paper in the water)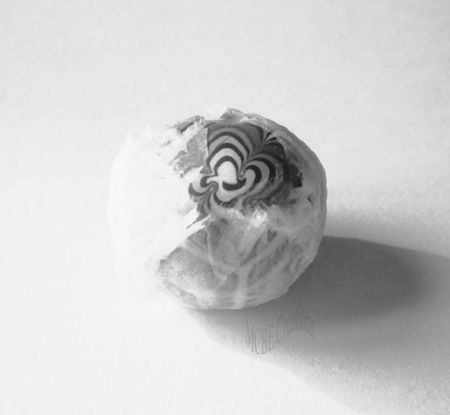

Roll the bead in your hands, in order to mix well the paper: you will obtain a good ball, which will leave 2-3 mm between the bead and the cage.

Let it dry. If it is still damp, don't worry, bec ause the bead will not be completely covered and the dampness will evaporate during the baking.
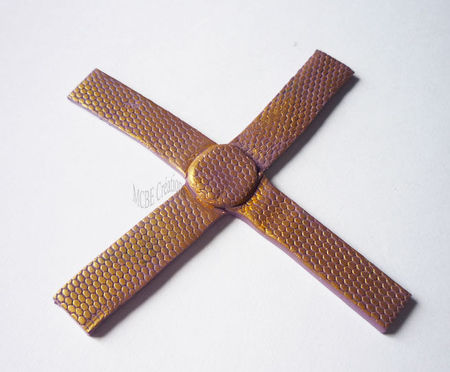
Condition the clay, form a log and put it in the clay gun with a rectangular end piece. You will obtain a long strip (you can also do it without the clay gun).
Cut the strip and texture it as you prefer: here I used a piece of net.
Cut the edges to obtain a 1 cm. strip, for 20 cm length.
Cut 4 strips 3-4 cm long, which more or less corresponds to the perimeter of the paper ball.
In the rest of the clay, cut also 2 rounds 1 cm. diameter (I've used a kemper cut).
Cover the strips with a golden pearl-ex, leaving 5 mm on each side without powder in order to let the strips adhere on the circles.
Place the strips to form a cross, with the textured face downwards. Let it adhere without pressing too much.
Turn it over ant texture the circle. Put some pearl-ex on it.
Turn it over again and place the paper ball in the middle, and pull up the strips on it. Correct the length of the strips to obtain this:
(normally, you would not have pearl-ex on the strips on top, where the circle will be placed)
On top you will dig a little with the help of the head of a pin the middle of the circle to place a little bead, fixing it with some liquid fimo.
(Here I put some pearlex before, but you can put it very well after the cage is mounted)
Bake following the instructions.
After baking, plunge it some time in the water, but not too much because the paper is not too much thick.
with a tweezer or a crochet you will take away the paper with delicacy:
And you have the bead in a cage! You will only have to sand the edges and varnish:
This model is not so refined, because the interior bead is not well-matched to the cage.
Another example :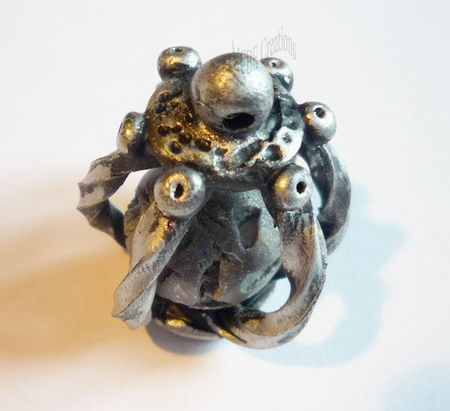


/http%3A%2F%2Fparoledepate.canalblog.com%2Fimages%2Ft-jadeite.gif)
/http%3A%2F%2Fstorage.canalblog.com%2F39%2F21%2F52426%2F64881048_o.jpg)
/http%3A%2F%2Fstorage.canalblog.com%2F80%2F65%2F52426%2F62755325_o.jpg)
/http%3A%2F%2Fstorage.canalblog.com%2F61%2F31%2F52426%2F62717006_o.jpg)