We always need some mokume gane!

here it is the bebedesiles version
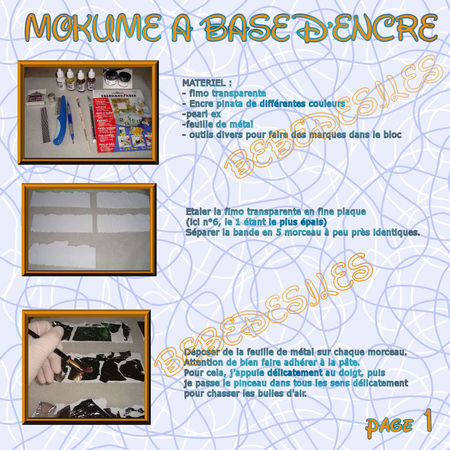
Page 1: Materials: translucent fimo, Pinata inks in different colours, pearl-ex, metal foils, different tools to make marks in the log of clay. Roll the translucent clay through the pasta machine in a very thin layer (here at setting nr. 6, nr.1 being the largest one). Cut the sheet into 5 stripes more or less equals. Lay down the metal foil on each stripe. Take care of letting it adhere very well to the clay. To do this, I gently press with my finger, then I pass the brush in all directions to remove all air bubbles.
Page 2: Pearl-ex: apply some pearl-ex on the metal foils. Let some dashes fall down, then spread it gently with your finger. Inks: Choose your colours, then lay down some drops on the clay covered by the foils. Leave one of the stripes without ink. Here I chose yellow, mandarin, orange, with a dash of white here and there. The melt out appearance: I choose to melt the inks with a brush. Let them dry completely, it is quite fast.
Page 3: Shaping of the log: cut each stripe into three parts more or less equals. Stack the slices, putting every now and then a slice without ink. Finish the stack with a slice without ink, with the translucent on the top. Let the slices adhere very well, by passing a brayer. Cut the log you obtain and stack the two pieces. Repete this step again and let the pieces adhere well using the brayer.
Page 4: with different tools (paintbrush handles, pen caps, comb, waved blade, cutting tools...), mark the log to print some patterns into the clay. Take care not to completely go through the log. If needed, fill up the holes with some leftover clay. Re-shape the log by pressing it on each side. Scalp some thin slices with a cutting blade. You can put the log on a curved area (a light bulb, a soda can...) to make this easier. Cover some clay beads or plates with the slices obtained. Bake and polish them as usual. You can vary the colour, try with others media and have fun with this technique!
This tutorial with images is an intellectual property of its author.
Please, respect his/her work and do not copy / reproduce / translate it without his/her authorization.
Translated by Maria: chiocciolazzurra@yahoo.it


/http%3A%2F%2Fstorage.canalblog.com%2F61%2F88%2F52426%2F120273461_o.jpg)
/http%3A%2F%2Fveblog.canalblog.com%2Fimages%2Fgifoeuf.gif)
/http%3A%2F%2Fstorage.canalblog.com%2F54%2F80%2F52426%2F115598565.jpg)
/http%3A%2F%2Fstorage.canalblog.com%2F84%2F38%2F52426%2F115249638_o.jpg)