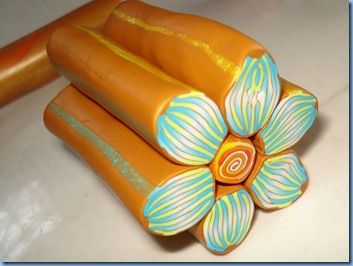
A Flower cane in a blue white and green blend
I wanted to make a green flower, but as green is not my favourite colour, I've made this skinner blend with some blue clay (nr. 49) and some green (cernit nr. 215). In order to lighten it up, I interpose between the two colours some white, made with half white 0 and half fluo. As fimo and cernit do not have the same thickness/consistency, I cut the geren cernit with some white fimo very soft, until the two clays have the same thickness. I've used a pasta machine for these blends, a ruler to cut the canes, some coloured clays and some translucent clay.
Picture 1: first, I make a blend with blue and white, then a grren and white blend with the pasta machine setting nr. 1, and then I put the two blends together. As for the amunt of clay I use: for every blend I use around 1/3 of a 56gr block, adapted to the dimensions of the pasta machine. The "trio" blend (1/3 green+1/3 white+1/3 blue) I obtain has then been rolled through the pasta machine in order to obtain the accordion shape.
Picture 2: some gold clay has been rolled through the pasta machine at setting nr. 6, and wrapped around the block obtained from the blend.
Picture 3: the cane obtained is stretched on the length side and made as thin as possible, paying attention to keep the colours well distinguished through the band, the green on one side and the blue on the other, with the white always in the center. Then, the cane is passed through the pasta machine on the larger setting to obtain a long ribbon.
Picture 4: the long ribbon is measured and then cut into several equal small ribbons (you cut the ribbon according to the length you have obtained). I obtained 11 small regular ribbons and I put them together top-to-tail, reversing the colour each time.
Picture 5: the top side is tightened with a slight pressure in order to shape the point of a petal.
Picture 6: I put a string of golden fimo to fill the gap and I wrap the cane with a sheet of the same colour rolled at nr. 6 setting of the pasta machine
Picture 7: the base will remain slightly flat but will be filled up with some gold clay rolled at nr. 6 setting of the pasta machine
Picture 8: the petal cane which results is light at the center and golden around. I make an attempt with the leftovers of the cane in order to the the harmony of the colours.
Picture 9: In order to prepare the heart of the flower, I choose some colours which are opposed to the petals: a fire blend made with these fimo colours: 26 red+42 yellow+16 yellow+white 0 (the proportions are irregular, as I wanted to obtain a quite light cane, using less red then the other colours). As I want to keep a large part of the cane to make some assorted beads, I build up a cane far more large then what the heart takes.
Picture 10 : The coloured accordion.
Picture 11: the accordion covered by a golden sheet made at the pasta machine setting nr. 6
![]()
Picture 12: the result from picture 11 is rolled with the pasta machine at the larger setting, in an opposite direction to that of the green-blue ribbon, which was rolled in the length to obtain a long ribbon. The red-fire cane is rolled on its entire width passing through the pasta machine breadth to obtain a large shaded ribbon. This big sheet is cut into 3 identical sheets rolled together.
Picture 13: the green-blue cane is stretched on a multiple of 6 and then cut. a piece of the red-fire cane is stretched corresponding to the flower cane length.
Picture 14: the assembling of the flower cane with the points outside.
Picture 15: finishing with some translucent clay. You can use a solid colour if you prefere.

Picture 16: The cane completed and cut.
Have a nice clay!!
Medusa
merci à maria pour la traduction de cette
leçon en images à la demande
de nos lectrices non francophones
pour la version en français c'est ici


/http%3A%2F%2Fstorage.canalblog.com%2F61%2F88%2F52426%2F120273461_o.jpg)
/http%3A%2F%2Fveblog.canalblog.com%2Fimages%2Fgifoeuf.gif)
/http%3A%2F%2Fstorage.canalblog.com%2F54%2F80%2F52426%2F115598565.jpg)
/http%3A%2F%2Fstorage.canalblog.com%2F84%2F38%2F52426%2F115249638_o.jpg)